Did you know that some scented candle makers only put the candle’s fragrance in the top ring? This is why many candles smell strongly in the shop but are underwhelming when you get them home. If you’ve had a problem with your candle where it hasn’t lasted for as long as you would have liked, or if you want to make the most of the scent, then here at Cosy Owl, we’re able to help with our latest candle hacks.
So, to help you make the most of your candles, we’ve spoken to our expert, Richard Fewings, who knows all the latest DIY candle hacks. Read on to find out more.
Candle Hack One: How to make your candles burn slower
We’re often asked how people can prolong the life of their candles. The best way of doing this is to add a pinch of salt to the melted wax after you’ve blown it out. Just make sure that you give it a quick stir with a toothpick or something similar. Then, the salt will slow down the burn time when you light it up next.
As an aside, you may have read online that putting your candle in the freezer will make the wax harder and make it burn more slowly. However, there’s no evidence that this process actually works and there are several potential negatives. For example, freezing could crack your candle, the wax could pull away from the container, or it could alter the fragrance of the candle. Due to this, you should avoid placing your candle in the freezer.
Candle Hack Two: How to properly put out a candle
Before you blow out your candle, you should wait until the wax has melted all the way to the edge, as this will prevent the candle tunnelling (this is where a candle burns down in the centre, leaving a rim of hard wax around the outside).
If your candle tunnels, then it will not burn for as long as it should. Plus, it may cause you to eventually lose your wick entirely! To prevent tunnelling, you should never extinguish your candle by blowing on it. Instead, place a glass lid (or just a glass if you don’t have a lid) over the flame until it goes out.
Candle Hack Three: How to avoid tunnelling
Having read the above hack, you may be wary of tunnelling. Thankfully, there are a number of ways you can prevent it from happening.
Firstly, you should pay particular attention to your candle on the first burn. If the top of the candle isn’t completely liquefied, then the middle will burn down. As soon as this happens on the first burn, the candle will always tunnel from then on. So, be prepared to allow your candle to burn for longer on the first burn.
As a general rule of thumb, you should allow your candle to burn for about 1 hour per 1 inch in diameter of wax on the first burn. Following this, you should always try to burn a candle until the entire top is melted into a pool.
Sadly though, if the candle manufacturer selected the wrong wick for the container and wax, the candle will always tunnel and there is not much you can do to prevent this from happening. This can happen with all candles regardless of price or quality, but it’s much more likely to happen when the candle is made with a cheap wick or cheap wax.
Thankfully though, if your candle has already tunnelled, then you can revive it using the foil method. To do this, simply wrap the upper half of the candle with tin foil and ensure this wrap slightly covers the top (you should still leave plenty of room for you to see the flame when you look from above).
Once you have assembled the foil, allow the candle to burn until the top is completely liquefied. Then, remove the foil before putting the candle out using a glass or a glass lid. After the candle has cooled, you’ll find it is no longer tunnelled.
Candle Hack Four: How to lengthen or shorten a wick
If your candle wick is too short or it has become brittle and broken, then it’s easy to fix.
Firstly, try to relight the wick and see if the problem persists. If the problem has not resolved after 20 minutes, then blow out the candle and place any melted wax on a paper plate. Once the wax has cooled, you can throw it away.
This 20-minute burn should have created a small indent around the wick, so more of it should be exposed. If you can clearly see the wick and it isn’t covered by wax, then you can relight it. At this stage, it should work as usual. If you still cannot see the wick, you’ll need to expose it by scraping out the room-temperature wax using a butter knife.
Alternatively, if your wick is too long, then you can trim it using scissors or a wick trimmer. As a guide, your wick should be between 1/4” and 1/8”.
Candle Hack Five: How to replace the wick
How you replace your wick will depend on whether you’re using a pre-waxed wick or a wooden wick. Either way, wicking your container or mould is actually a relatively straightforward process.
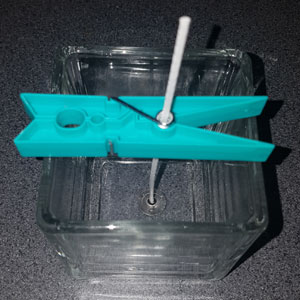
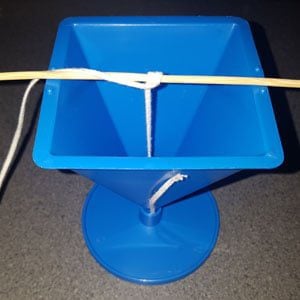
When using a pre-waxed wick, simply use a glue tab or molten wax to adhere the wick to the base of the container. Then, use a peg or a hair clip to hold the wick in the desired position while you pour the wax. If you’re using a mould rather than a container, then you may need to wick the candle after it has been made and cooled. This is done by placing a wick wire in its place, which is then removed and replaced with a wick later.
If you’re using a wooden wick, you’ll need to melt a small amount of wax before you dip in the wooden wick, ensuring both sides are fully coated. Then, lay the wick over the wooden pot and allow the wax to cool and cure. Once hardened, place two wicks together and ensure there’s a small section of unwaxed wick at the top. Then, place the waxed end in your sustainer. Finally, add a glue dot to the base of your sustainer and push this down into your container. You can hold the wick centrally while it dries.
Hack Six: How to clear candle wax off a surface
When you’re burning or maintaining your candle, it’s easy to spill a small amount of wax on a nearby surface. There’s no need to worry if this does happen though, as it’s easy to clean up.
All you need to do is gently blow out the candle and then slowly heat the spilled wax using a hairdryer. When the wax is fully liquefied, you can then wipe it away using a towel.
For more information take a look at this TikTok vid.
Hack Seven: How to make new candles using leftover wax from old candles
If you have leftover wax from your old candles, then you can recycle this wax and create an entirely new candle with interesting colours and scents (you’ll just need a couple of wicks).
Just add a wick to your container using the process in hack five and then melt down your remaining wax. Once this is liquefied, pour the mixture in the container and leave it to set.
But, before you melt your remaining wax, just make sure that there are no pieces of burnt wick in the mix. You should also try not to mix different types of wax together, as these may have different characteristics and melting points.
For more information take a look at this TikTok vid.
Hack Eight: How to remove the unusable bottom of the candle and use the wax on a wax burner
If your wicks have burnt down then you may have a chunk of wax in the bottom of your candle which is unusable. However, you can revive this wax and use it as a melt for a wax burner.
Simply fill your container with water and place it in the microwave for two minutes (keeping a careful eye on it). When you take the candle out of the microwave and the mixture cools, the wax will come free from the base of the container and float to the top. At this point you can take the wax out, break it up and use the pieces for melts for a wax burner.
For more information take a look at this TikTok vid.
Hack Nine: How to recycle / reuse your empty candles
Finally, if you’ve burnt through all of your candle, then you can still use the container for other purposes. Popular options include makeup brush holders and plant pots, but the world is your oyster!
All you’ll need to do is add warm water to the container to make the wax soft and then scrape out any leftover wax. Then, give the container a good clean and it’s ready to use.
We hope you’ve found these candle hacks incredibly useful. Why not tag us on Instagram and show us your creations?


